Olly?s 1:12 Blog - Part 2

For the second part of Olly?s 1:12 blog Associated team driver Olly Jefferies talks about lipo and the art of cutting out a body shell, take it away Olly.
Recently I have started testing lipo in my R5 and I am pleased to report it has gone really well. I have been very surprised with the performance and it feels quicker than with cells. Overall, I didn't have to change much on the car. I moved my sensor lead and fitted a receiver pack to help with the voltage. Then I ran the car on a touring car style track, which was quite bumpy and not ideal for 1:12, but I was happy with the results. The car did not feel drastically different with the Lipo and I don?t expect to be making any big set up changes to get the car on the pace. I certainly need to put the car up against the other top modified drivers and check they don?t spank me down the straight. My initial feeling is they won?t however, I still have some work to do but may run out of time before Newbury, so Sunday morning should be interesting and I am expecting a busy day.
This week I am preparing for the second round of nationals at Newbury, this one is going to be tough as all the quick drivers will be there including the pre-event favourite Andy Moore. I will completely rebuild my car for every round round, my prep between nationals is basically cleaning the car, it does not need to be rebuilt with new parts every time. I check all bearings and diff and rebuild both shocks with fresh oil. Maintenance on a 1:12 is reasonably cheap and I think that the low cost factor is one that makes 1:12 racing popular at club level.
Olly's Top Tip
I spoke in the last blog about small hints when building the car. This week I am going to help with mounting body shells. I find this one of the most difficult things to do and one of the most important things when racing any on road class. Have you ever bought a shell, spent hours of time doing a great paint job then got it all wrong when mounting? Hopefully this will help you.
I have a template for all my bodies. For this I use an old shell and cut out the main piece with the mounting holes (see picture below). I always use an old body which works well so don?t bin your battered old shell as they can come in handy.
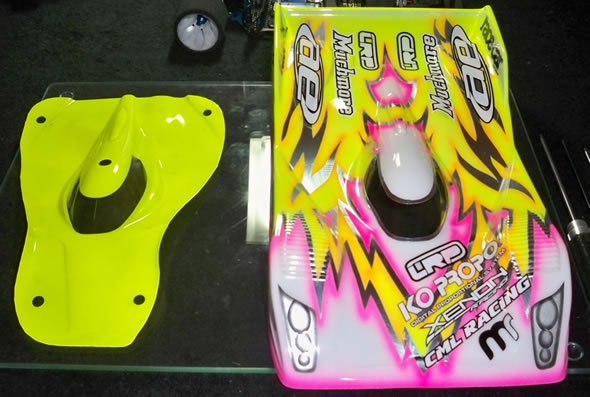 Keep an old shell so you can tell where the body holes are supposed to go.
I always find it better to paint the shell first before cutting it out. I have learnt you can paint the body, put it down to dry, and if the shell is not flat, it can twist slightly. So ,make sure the shell is flat and leave the arches in as it gives the shell much more rigidity. I know some people find it easier to cut out shells before painting but I think this way of doing it gets around most of the problems. I know some people put a whole shell over one another but this means the shell underneath is in a slightly different place than the one above. Doing it with a template I find works really well assuming your template is well cut out.
So once you have trimmed the body around the bottom it?s time to mount the holes. Place your body template over the shell, make sure its nice and flat, then mark the holes with a pen. It?s always worth double checking that the mounting holes are in an equal place either side, you can easily check this with a ruler. Once you have drilled the holes check that the body fits nicely. When it comes to cutting the arches, I always have the car ready to go with all radio gear in. I also set all the geometry so all the wheels are in the position they will be when the car is ready to run.
Keep an old shell so you can tell where the body holes are supposed to go.
I always find it better to paint the shell first before cutting it out. I have learnt you can paint the body, put it down to dry, and if the shell is not flat, it can twist slightly. So ,make sure the shell is flat and leave the arches in as it gives the shell much more rigidity. I know some people find it easier to cut out shells before painting but I think this way of doing it gets around most of the problems. I know some people put a whole shell over one another but this means the shell underneath is in a slightly different place than the one above. Doing it with a template I find works really well assuming your template is well cut out.
So once you have trimmed the body around the bottom it?s time to mount the holes. Place your body template over the shell, make sure its nice and flat, then mark the holes with a pen. It?s always worth double checking that the mounting holes are in an equal place either side, you can easily check this with a ruler. Once you have drilled the holes check that the body fits nicely. When it comes to cutting the arches, I always have the car ready to go with all radio gear in. I also set all the geometry so all the wheels are in the position they will be when the car is ready to run.
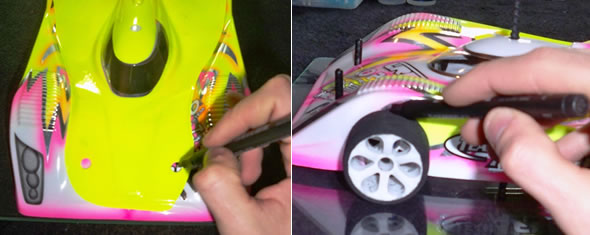 Use a non-permanenet pen to mark where the holes and wheel arches should be.
There are many different ways of doing arches. I find getting a tyre and wheel and drawing around it works well. Line the axle hole in the wheel up with the axle of the car and then draw around it with a fine pen. You can check it lines up ok and if not, just wipe off and do it again. I then use a pair of sharp curved scissors to cut out the arch. This is something that taking your time at really pays dividends. I know it?s easy to rush cutting out a body but it does reward patience.
Now you should have a shell mounted and cut out. When it comes to doing the bottom of the shell I find it?s easier sometimes to put some tape around the bottom and cut to the edge. Always check before running any shell that all the arches clear the wheels when on lock! When running a 1:12 car on foam tyres its best to round the edges of the arch off a little more than you normally would. You don't want a razor sharp wheel arch cutting into your tyres.
Use a non-permanenet pen to mark where the holes and wheel arches should be.
There are many different ways of doing arches. I find getting a tyre and wheel and drawing around it works well. Line the axle hole in the wheel up with the axle of the car and then draw around it with a fine pen. You can check it lines up ok and if not, just wipe off and do it again. I then use a pair of sharp curved scissors to cut out the arch. This is something that taking your time at really pays dividends. I know it?s easy to rush cutting out a body but it does reward patience.
Now you should have a shell mounted and cut out. When it comes to doing the bottom of the shell I find it?s easier sometimes to put some tape around the bottom and cut to the edge. Always check before running any shell that all the arches clear the wheels when on lock! When running a 1:12 car on foam tyres its best to round the edges of the arch off a little more than you normally would. You don't want a razor sharp wheel arch cutting into your tyres.
 Take your time when mounting your shell. Patience is a virtue!
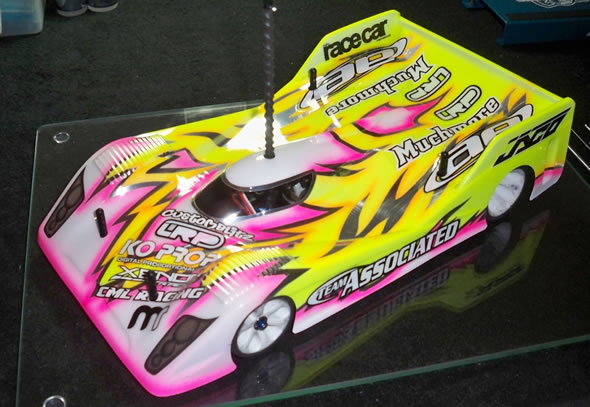
So once you have put all you decals and number on the car its time to go race. Sometimes you can spend all evening getting a shell ready then in just a couple of corners you can destroy it, but I suppose that's racing!
My next blog will include a small report from Rd 2 of the BRCA Nationals, and a more in depth report on how the lipo went at Newbury, so stay tuned.....
STOP PRESS, OLLY WINS MODIFIED NATIONAL AT NEWBURY, REPORT TO FOLLOW
Take your time when mounting your shell. Patience is a virtue!
So once you have put all you decals and number on the car its time to go race. Sometimes you can spend all evening getting a shell ready then in just a couple of corners you can destroy it, but I suppose that's racing!
My next blog will include a small report from Rd 2 of the BRCA Nationals, and a more in depth report on how the lipo went at Newbury, so stay tuned.....
STOP PRESS, OLLY WINS MODIFIED NATIONAL AT NEWBURY, REPORT TO FOLLOW
Keep an old shell so you can tell where the body holes are supposed to go.
I always find it better to paint the shell first before cutting it out. I have learnt you can paint the body, put it down to dry, and if the shell is not flat, it can twist slightly. So ,make sure the shell is flat and leave the arches in as it gives the shell much more rigidity. I know some people find it easier to cut out shells before painting but I think this way of doing it gets around most of the problems. I know some people put a whole shell over one another but this means the shell underneath is in a slightly different place than the one above. Doing it with a template I find works really well assuming your template is well cut out.
So once you have trimmed the body around the bottom it?s time to mount the holes. Place your body template over the shell, make sure its nice and flat, then mark the holes with a pen. It?s always worth double checking that the mounting holes are in an equal place either side, you can easily check this with a ruler. Once you have drilled the holes check that the body fits nicely. When it comes to cutting the arches, I always have the car ready to go with all radio gear in. I also set all the geometry so all the wheels are in the position they will be when the car is ready to run.
Use a non-permanenet pen to mark where the holes and wheel arches should be.
There are many different ways of doing arches. I find getting a tyre and wheel and drawing around it works well. Line the axle hole in the wheel up with the axle of the car and then draw around it with a fine pen. You can check it lines up ok and if not, just wipe off and do it again. I then use a pair of sharp curved scissors to cut out the arch. This is something that taking your time at really pays dividends. I know it?s easy to rush cutting out a body but it does reward patience.
Now you should have a shell mounted and cut out. When it comes to doing the bottom of the shell I find it?s easier sometimes to put some tape around the bottom and cut to the edge. Always check before running any shell that all the arches clear the wheels when on lock! When running a 1:12 car on foam tyres its best to round the edges of the arch off a little more than you normally would. You don't want a razor sharp wheel arch cutting into your tyres.
Take your time when mounting your shell. Patience is a virtue!
So once you have put all you decals and number on the car its time to go race. Sometimes you can spend all evening getting a shell ready then in just a couple of corners you can destroy it, but I suppose that's racing!
My next blog will include a small report from Rd 2 of the BRCA Nationals, and a more in depth report on how the lipo went at Newbury, so stay tuned.....
STOP PRESS, OLLY WINS MODIFIED NATIONAL AT NEWBURY, REPORT TO FOLLOW